Thursday 18 September 2014

FOs (Sewing): More bags...

Project bags make wonderful swap gifts - they are useful, and they are rather quick to make. And while I'm still struggling to improve my sewing skills to a point where I dare sew adult sized garment, I have by now become fairly good at sewing project bags - nothing special, but hey! Half a year ago I wasn't even able to sew straight. So... I have made some progress.

A couple of weeks back, I found some cute owl fabric for sale in a local shop, and I made it into this drawstring bag for an angel package:


This was the first time I worked without a sewing pattern. I just knew what I wanted the bag to look like and how big I wanted it to be, cut out the fabrics - and it worked!

And then there was the fairy tale swap in August. I had come across some really cute Red Riding Hood fabric that I just had to use for that swap. I went by the Reversible Sock Knitting Project Bag tutorial again. I've used the pattern before and love it - all the instructions are already very clear in their written form, but there are also lots of pictures to guide you through every step.


And because I had (and still have) plenty of the Red Riding Hood fabric left after making the project bag, I made a matching notions pouch:


This is also a pattern I have used before - it's the Zipper Pouch pattern from the free Craftsy Class on Bag Making Basics that helped me take my first successful steps into machine sewing.

Saturday 13 September 2014

New Pattern: Dolores Cup Cosy

Let me start with the story behind this pattern. In mid July I found and joined a group called HP Knitting and Crochet House Cup on ravelry. It just sounded like tons of fun. I managed to hand in one single piece of homework as a Not Quite First Year before the end of the term and was sure I would play the next term as NQFY. I applied to be sorted anyway, and - surprise, surprise - I got sorted into Ravenclaw. Yay!

Now, one part of the House Cup is Quidditch. The first task this term is to convince a certain professor D. Umbridge to let us play - which means we are to make things that dear Dolores would love. And this is where the cup cosy comes in. I am sure the old hag our esteemed Madame Umbridge would not want to miss her tea while watching a match. But we wouldn't want her to ruin her hideous good tea china in a mishap while accidentally cheering during the match, now, would we? On the other hand, we would not want her to hurt her claws delicate hands on a hot to-go cup, either - right? So she needs her own very special cup cosy. It is bow-shaped, and the first version I made is pink and purple - it looked so very much Umbridge that I even named the pattern after her.


These cosies are very easy and quick to make. I used about 20 m of super bulky yarn (16.5 m of the main colour and 3.5 m of the contrast colour). The only skills required are knit, purl and a bit of seaming (whip stitch or slip stitch). The pattern includes in-progress pictures.

Oh, and by the way, you can easily modify the pattern to make bracelets or headbands (I have included suggestions in the pattern, but have not yet got around to test them myself).

And last, but not least - the link to the free pattern: Dolores Cup Cosy.

Wednesday 3 September 2014

FO (mostly knitting): Fairy Doll

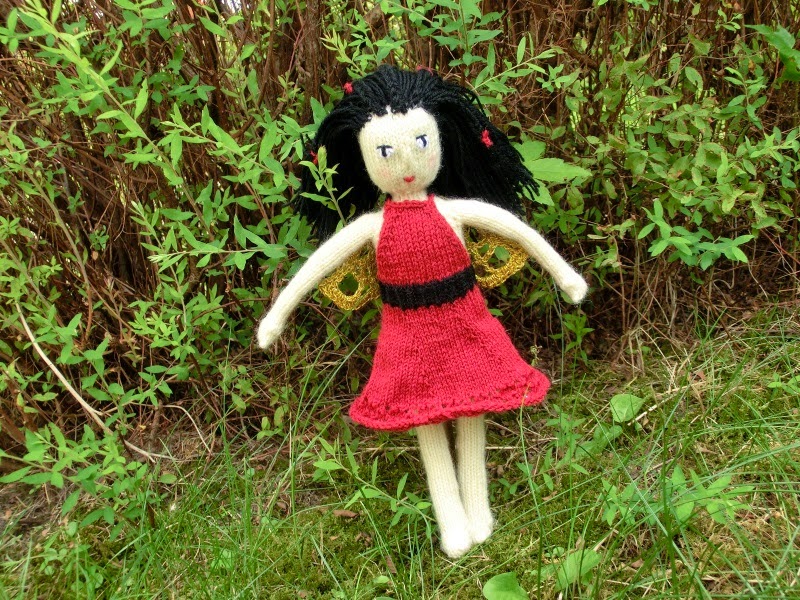
One of my favourite projects in the last couple of weeks was a fairy doll that I made for a fanasy themed angel package. I came up with the idea of making a fairy doll, but couldn't find a pattern that I really liked. I did find a pattern for a nice looking Halloween Witch Doll, though - and went from there. It turned out to be a good source to get the dimensions right, but I found myself heavily modifying the pattern right from the start.

The pattern calls for a sport weight yarn. I used a double strand of sock yarn to produce a fairly tight fabric on 3 mm needles. 

The doll is knit in the round, starting with the legs. Changes I made to the pattern include shaping the feet, trying to shape the waist a little (I could have done a little more shaping there), hand shaping (thumbs), modifying the shoulders and neck and completely changing the head (apart from the nose shaping). I have noted down all the changes on my project page. The result of all these changes was this:


Now, I had to give her a face, hair, wings and clothing. I went with the pattern for the face, and quite liked the result. I gave her slightly rosy cheeks using a red pencil. Until this point, the question of what colour her hair would be was still open - but once I saw the face, I knew she needed black hair. I gave her LOTS of hair - in retrospect I must say I could have given her a little less.


Then I crocheted a pair of golden wings. I found a cute wing pattern as part of this fairy pattern. It's in Spanish, but provides charts. I changed hdc to dc (except for the last row), and dc to tc (US terms).


Almost done, all the fairy needed now was a dress. I decided to make up my own pattern for the dress, and this is what I came up with:

Fairy Dress

Yarn: fingering weight yarn 
Needles: 3 mm (DPNs or circulars for magic loop)

Instructions:
Skirt
Cast on 40 in main colour, join in round (start/end of round will mark the back of the dress)

R1&2: knit
R3: increase 5 sts evenly around (using m1 increase)
Repeat R1-3 until there are 80 stitches on needle.

Lace edging
R1&2: knit
R3: (p2tog, yo, k1, yo, p2tog) around
R4: knit
Repeat rows 1-4 once more.

Purl one row.
Cast off (icelandic)


Body
Starting at the centre of the back of the dress, pick up and knit 40 sitches from cast on round, join in round.
Next 5 rounds: (k1tbl, p1) around.
cast off 10, knit 20 in established pattern, cast off 10

Change to main colour, work six rows of stockinette stitch over the 20 remaining stitches, then start decreasing:

Right side rows: k2, ssk, k to 4 before end of row, k2tog, k2
Wrong side rows: purl

Repeat until 10 stitches remain
k2, cast off 6, k2

Make 2 stitch icord straps in contrast colour (long enough to tie behind the neck).

Work away all ends, put it on the fairy and enjoy ;).